Sunday, January 31, 2016

Industrial Paper Towel Holder!!!


I originally was looking for a chicken wire paper towel holder, but couldn't really find one that I loved as a standing option. I went to etsy and began scouring. I started to see these paper towel holders made of pipes! You know I loved that look. With shipping the one I decided one would have cost me $51. Me, thinking I can make just about anything, said...I bet if I make a trip to home depot I can make this. 

It was Friday and I had to work...but after work it was on! I dropped by my neighborhood location and the sales associate near the pipes went to work after I showed him a picture. We compared it to play in with Legos. 

We started with a 1/2, 12" pipe for the longest leg and an 8" for the short. The "black" pipes were less expensive so this is what we went with.

Here are the exact pieces I used and the quantity:
1, 1/2", 12' black steel pipe
1, 1/2", 8' black steel pipe
3, 1/2" Black street elbow
4, 1/2" black tee
2, 1/2" black caps
3, 1/2 x CLOSE black steel pipe nipple
1, 1/2 x 3/8" bushing

Having the etsy picture as a guide we added "t" shaped jpints, elbows, and straight connectors to create this beauty. 

I went to the paint aisle and picked up the only oil rubbed paint I saw. With the paint being $7 my total for that night was $41. Although I didn't save a ton, I had instant gratification. 

Once home I painted and the following day added felt feet....just in case! I love the results!


post signature

Monday, August 10, 2015

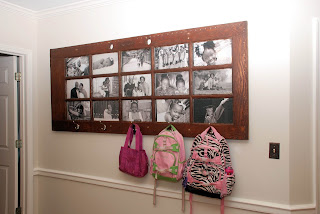
Old Door: NEW LIFE!

 
I hardly use this blog anymore - with the exception of when I want the Pinterest world to see!
I saw, on Pinterest (or course), a posting regarding updating and old door and turning into a functional art piece!
 
So, let me start you from the beginning...
 
Finding a Door: probably easy right - well, let me caution you in saying, pick a "nice" door that hasn't been a thousand times - but the old charm is SO nice...but that sanding?? I found mine at a salvage, old wood scrap place.
 
 
Preparing the Door: So the preparation of the door took the MOST time, but I wanted to do it right. I was originally going to just paint it...and although, that would have saved me a lot of time, my husband said...why don't you just stain it. Then that took me down a completely different rabbit hole.
I washed it - it was pretty grimy from being at the salvage barn yard for probably a decade.
I washed it some more - basically I needed a pressure washer to get the peeled paint to loosen up. I used a liquid paint thinner first...and it did an OK job, but a lot of paint remained.
 
I didn't own a sander, but I certainly do now! I started off with like 100 grit sandpaper...and didn't realize until late in the game, I really should have started with the lowest possible. The door was OLD...and had been through a lot...but had wonder character. Since it was old, the thoughts of lead paint crossed my mind a bit...but I kept on. After finally removing most of the paint...the metal/cooper door sidings (we now use plastic and rubber)...most of the tiny nails holding these in place...I was ready to stain.


Staining: Word of caution before you begin staining...make sure ALL the paint is off...because stain doesn't cover paint! I had to learn this the hard way - and re-sand and paint again. What I also learned was I could use steel wool to remove some of the stain in a "rustic" manner before it dried too much. Loved that effect and did it all over the door.
 
Pictures: The windows in this door were and odd size, and I ordered as close as I could get which was 8x12. Even then, I was about a 1/2 inch short. I compensate for this, I applied black, bulletin board paper across the entire back as a background. You can hardly notice. Also, my pictures are black and white, to disguise. I used sharp prints...but have used arts cow in the past and they tend to have great prices.
 
Mounting: This is probably the most challenging aspect - measure, measure, measure and drill once! I picked a wall in my kitchen nook. I also added hooks to the bottom for the kids coats/bags, etc. So like a new age mud room...yeah...lol.


I love the results and wish you the very best of luck and sending encouragement if you decide to try this out!


post signature

Friday, August 29, 2014

Two colored UGA burlap wreath

 
I am just so proud of myself...and I didn't even scope out Pinterest before I tried my hand at making a two colored UGA burlap wreath!
 
Materials I used:
  • 16'' wire wreath (three rows)
  • ~22 feet of burlap (2x because I used two colors - probably have to double that if just using one color) - nice 6'' rolls from hobby lobby (http://shop.hobbylobby.com/products/6-red-burlap-spool-701185/) - of course it's cheaper online than what I paid (of course!)
  • 5/8 ribbon (various colors - I used swiss dot pattern)
  • 1 yard of regular burlap fabric - I probably used about 1/2 of this actually
  • Red, White and Black acrylic paint (I actually used a red fabric marker)
  • Floral wire
  • Staples or glue gun (or you can sew it!)
  • Plastic shopping bags
 
Process:
I began with securing the burlap to my wire wreath using floral wire (22' gauge, just want I had already). Then did the 1 and 3 rungs with one color, and the opposite color in the middle - and I alternated until I was finished. I pushed the burlap through the rungs and made a medium sized loop on the first on the wreath. When I was finished (~15 minutes) - I had to return to the store to get more burlap, because the 15' wasn't enough, I cut and tied it off using the gauged wire.
 
I think added my ribbon tying it around the wire rungs as I felt necessary - I heat secured the ends of the ribbon so they would not fray.
 
Center:
This is what took the longest - I didn't want to wait on the paint to dry...but you must! I printed of an image of what I wanted the center piece to look like and used it as a template. I did one color at a time and made sure each one was dry before I started the other. A good protective measure would be to add mod podge to your image before adding to your wreath.
 
Pulling it all together:
Once the center piece was done - I painted it completely before I cut to the proper shape and stuffed - I attached it to the wreath. I finished the center piece by cutting a large circle around my painting -two ply - and stapled the pieces together (probably better to sew, but you could also hot glue) - leaving an opening to stuff with plastic shopping bags. Once stuffed (here is where I probably should have added mod podge for sealing) arrange securely to wreath using floral wire.
 
Viola! You're all done.


post signature

Thursday, February 20, 2014

Little Shamrock


I'm posting this because it's so darn cute!  Special thanks to silhouette for making a user friendly product! 


Thursday, October 28, 2010

Kennedy's 4th Birthday


post signature

Wednesday, September 8, 2010

Avery's 1st Birthday!!!


We had a great time celebrating Avery's first birthday! The decorations were just right and I think everyone had a good time. I wasn't super stressed...so, I had a good time! The only regret that I had is I didn't take ANY pictures. These are from my Dad's perspective...so, what are you gonna do!

Avery also had her 1 year appointment. I can't remember exactly the stats, but she's still right at 50% for everything (weight, height and head circumferance).


post signature

Sunday, July 25, 2010

For Nikki


post signature

Monday, July 5, 2010

Got a Picture Taking Itch

the only problem with taking pictures of your own kids - is they want to come to YOU instead of going in the opposite direction.

Preparing for Avery's 1st Birthday!


Monday, June 28, 2010

Sorry Mel!!!

Wow, I know it has been forever, but such is life...sorry Mel for not posting.

Updates - I may have some pictures to add later.

Avery had her 9 month appointment a few weeks ago. She is growing well and meeting all of her milestones. She is crawling like a pro now and beginning to surf (holding on to things and walking). She's still a bit shaky, but it amazes me how much progress she makes in just a short week.

At her appointment Avery weighed 19lbs, 1oz. She is still at the 50%. It is still awkward for me to hear that she is growing right on schedule due to my experience with Kennedy.

Kennedy weighs right around 30lbs now. ...and lately she has had a real appetite. Maybe she's growing.

We are currently all adjusting to our new living situation and I think Kennedy is taking it the hardest. She comes running to my bed just about every night- and she NEVER wants to sleep alone. Poor baby...I hope I haven't given her a complex that will follow her the rest of her life (I pray...I haven't).

post signature

Thursday, March 4, 2010

Busy Bee...!

So, the shutter bug really bit me this time! I have officially taken on my first paying customer for photography. I'm excited...and I think I've dived in head first!
I'm working on a website - but it won't be as involved as my uniquelyuboutique~! The best part about it is I'm carrying the name on...so, I'm pleased to announced "uniquelyupix!" - with an exclamation mark (cute right?).

The lady that did Avery’s announcements and my mommy calling cards put together a great logo for me…and I LOVE IT! So, it’s a work in progress, but you can monitor my milestones with uniquelyupix here: www.uniquelyupix.wordpress.com – I bought the domain, so it should be linked up pretty soon.

Other news…Avery is 6 months old….as of March 1st! I’m thankful she is getting more independent and is exploring the world. She is finally sleeping through the night like a champ…she has this sort of breathing thing that lets me know she is still sound asleep when I peek in on her in the mornings before I leave.

At her appointment – for some reason I wasn’t really paying attention…they said she was 16lbs…and some odd ounces…putting her right at 50% for height, weight and head circumference…so we have a middle of the road baby…or perfect!

As far as me, personally, I’ve been feeling overwhelmed and exhausted…just about every day. I have set a “wavering” bed time of 10pm…some days I make it…most I don’t. I feel like my weekends are work too…and I never get time to rest…although, I usually only have both of my kids 4 days out of the week – which I’m thankful for…but I miss Kennedy during the week. She’s a challenge sometimes, but most of the time she makes me smile…or laugh out loud.

Well…it’s 9:14pm…so you know my bed time is quickly approaching…! Until next time…love, laugh and live.


post signature